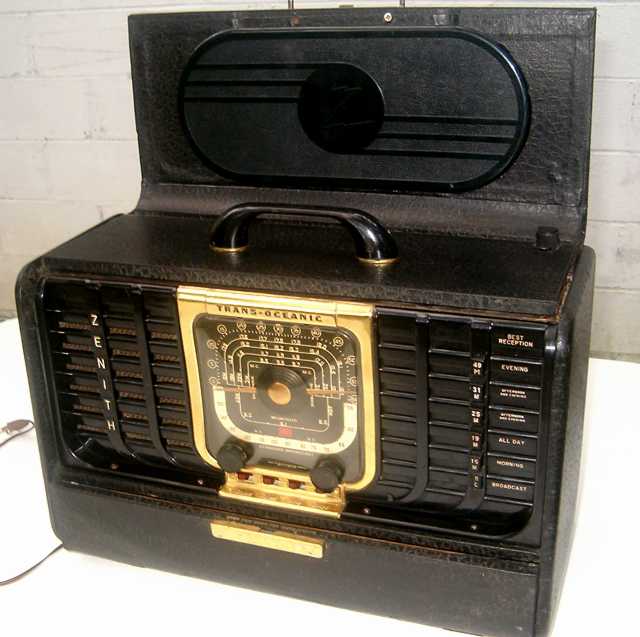
Zenith Transoceanic 8G005 Receiver
This Zenith Transoceanic model 8G005TZ1Y is one of the early postwar Transoceanics with loctal tubes. The serial number on this example is B505452. This TZ1Y variation of model 8G005 uses the 117Z3 rectifer. The speaker is stamped with 49CZ517.
While not heavy-metal boatanchors, the Zenith Transoceanics are favorites for short wave listening. The bands are push-button selected and cover primarily the international "world-band" shortwave segments. The bands are arranged so that no bandspread is needed. Click here to view a Transoceanic T600 that I repaired a few years ago and an H500 that I repaired more recently.
Among the tube Transoceanics, the 8G005 is prized by many collectors because of the brass surround, the push-pull audio, the special short-wave wave-magnet, the front information compartment, and that it was the first post-war model. The loctal 1LA6 converter is also a bit easier to locate than the expensive 1L6 used in the later models.
All of the Zenith Transoceanic sets are decent performers for shortwave listening with just the built-in telescoping whip antenna if the radio is working well. Schematic, alignment and other information for this and other Zenith Transoceanic models can be downloaded from Nostalgiaair .
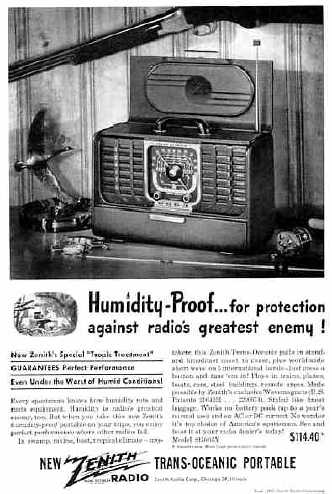
Here are Zenith advertisements for this model. Ads can be found in 1947 Holiday, National Geographic, and other magazines.

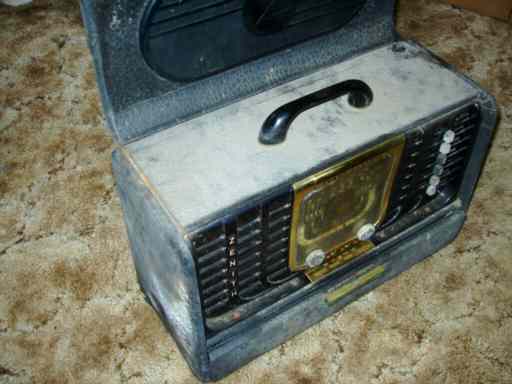
I bought this set at a hamfest (amateur radio swapmeet) in rough but restorable condition. The rubber power cord and battery wiring harness needed to be replaced because of the dried and cracked rubber insulation. I prefer dead sets that need significant work since part of the pleasure for me is the "sweat equity" and challenge of getting one of these old sets to work well again. Cosmetically, this set was very dirty but complete as can be seen from the "as acquired" picture below.
Repair notes
This set was given a thorough cleaning with white waterless hand cleaner. The cover material is relatively easy to clean. A coat of old fashioned black carnauba wax shoe polish made it shine again.
Repairs
I pulled the chassis and proceeded to use contact cleaner on all the switches and tube pins and sockets. The power cord was replaced. I also replaced the flaking battery wiring harness with the proper color wires. Found that the 0.05 MF cap across the power line was quite leaky and replaced it with a proper one rated for line voltage. I then plugged the power plug into the chassis socket to activate the 4PDT battery switch and fed power as if it were run on batteries. I used external metered power supplies for the 10 volts of "A" battery (but kept the voltage down to around 9 volts). A small Heathkit EF-1 power supply with small night light in series as current limiter was the source for the B+ supply.
Dead set
The set was totally dead. Using a small signal injector at the volume control caused just a slight response from the speaker. Injecting signal at the 1LE3 phase inverter grid caused a greater response. One half of the push-pull output system was working but not the other. I swapped output tubes but had the same result. In tracing the circuit schematic, I determined that the problem was in the 1LD5 detector-amp which feeds signal to both the 1LE3 and to one of the push-pull output tubes. The 1LD5 plate voltage was somewhat high. The schematic calls for only 22 volts on the plate. Found the screen grid measured only a couple of volts. The screen grid is fed by a 4.7 megohm reistor. I naturally assumed the screen grid bypass cap was a bit leaky which would pull down the screen voltage given such a high-value resistor. It was indeed somewhat leaky, but replacing it made no difference. Conclusion, open resistor. Replacing it brought the set to life.
While testing, I had connected the chassis to the broadcast wavemagnet loop antenna with clipleads. On checking the lid-hinge wire connections to the wavemagnet, found one of the connections open. Had to remove the top of the cabinet by removing the four wood screws and the handle to gain access to the hinges and wiring. Resoldered the wire to the hinge to repair the open circuit. Found that the wavemagnet itself also had an intermittent connection. A previous attempt had been made to repair that intermittent. The wavemagnet was partly separated at the glue seam on the plastic. I opened the seam a bit more, just enough to gain access to the point where the wire loop connections were soldered to the terminal buttons. Found one bad solder joint and carefully resoldered the connection to repair the wavemagnet. I then plugged in the 117Z3 and powered the set through my isolated variac while monitoring "A" and "B" voltages. I then enjoyed listening to the resurrected TransOceanic which was demonstrating every bit of performance I have come to expect from these great portables.
The Sierra Frequency Selective Voltmeter was the previous item on the bench.